Overview
The Main screen
Exposure parameters
Motion parameters
Ramping
Combining programs
Experiment
Roll your own program
Menu choices
|
TL-Plus beta 1.0The most powerful time-lapse and HDR sequence generator of all time
Overview
TL-Plus is an intervalometer app for the Android platform that you use to take a sequence of
photographs for the purpose of turning them into a time-lapse movie
or an HDR (high dynamic range) photograph.
However, TL-Plus does not use the camera on the Android phone to take the photographs, as explained in a few
paragraphs. But before getting into a discussion of how it all works, let's define a few terms.
What is an intervalometer?
An intervalometer is a device takes one or more photographs at a
specified interval. Historically, intervalometers have been electronic devices that attach
directly to cameras to automate this process. Until the introduction of TL-Plus, commercial
intervalometers were very linited in what they could do, containing a very small subset of the
capabilities of TL-Plus. Although TL-Plus is an intervalometer app, it requires one more
component before it can be considered a full intervalometer. It needs a way to connect to the camera,
as explained in a later section.
What is a time-lapse movie?
Even if you are new to the term time-lapse, you have probably seen examples of time-lapse movies. Typical
examples are plants sprouting from the ground or flower blossoms opening. Other examples include city scenes
that zoom by at an accelerated pace or a building site where you watch the entire construction process
take place in
in a few minutes time. Time-lapse movies
are created by taking a number of photographs at regular intervals and then combining them into a movie,
where each photograph becomes one frame of the movie. The elapsed time between shots is quite long
compared to the time between the frames of the movie. This speed difference results in a movie in
which the action is dramatically accelerated.
What is HDR?
A new and exciting kind of photography that co-emerged with digital photography is high dynamic range (HDR)
photography. By taking multiple photographs of the same scene at different exposures and then blending them
with software, it is possible to
extract a lot of othewise lost detail in both the shadows and the highlights of the scene. This
is known as extending the dynamic range of the image. This is also known as HDR and there are many
programs and web sites dedicated to this process.
Sometimes it is adevantageous to take as many as 9 photographs at different exposures to extract the most
detail from an image. TL-Plus supports up to 9 exposures and can combine HDR with time-lapse.
How does it all work?
TL-Plus can best be described as a graphical front end that you use to describe or define
the sequence of photographs you want to take. The back end is a second device that attaches to
your camera through the camera's wired remote control port. It is a programmable device and it
receives its program from TL-Plus via
Bluetooth. One example of such a device is AutoMate, made
by The Gadget Works. For the remainder of this manual
we assume that you are using AutoMate as your second device.
After you press a few buttons on the TL-Plus
screens and make a few
choices and enter a few numbers, your next step is to connect to AutoMate
and then tap the "Do it!" button.
At this point, TL-Plus analyzes
your input and your choices and generates a program in the language that Automate understands and then
transmits that program to AutoMate. AutoMate has a Bluetooth radio
and some computing power with which
to interpret the program that TL-Plus sends to it.
AutoMate stores the program in its memory as it receives it and once it has received the
entire program, it no longer needs the connection with phone. Program transmission
typically takes less than a second.
At this point, AutoMate reads the transmitted program from its memory and executes it.
The program contains commands for such things as firing the shutter,
rotating and tilting the camera, and
flashing the LED on and off.
Thus, AutoMate can be an intervalometer, an HDR machine, a panorama head, or
simply a remotely controlled tripod head. Since AutoMate can pan and tilt the camera,
you can use it to create panning as well as static time-lapse movies. AutoMate is also often used to create
gigapixel panoramas.
Special features of TL-Plus
TL-Plus has several features that distinguish it, including support for:
- Four-direction motion control
- High dynamic range (HDR) exposure bracketing for up to 9 exposures
- Daily sleep period
- Ramping of exposures, intervals, and motions
- Very long exposures and durations
- Camera wake-up
- Mirror lock-up
- Three levels of programability
- Ability to combine programs
Here is an example of a panning time-lapse created
with AutoMate.
The main screen
The main screen has controls for defining everything about a time-lapse seqment except
exposure bracketing, ramping, and motion control. You access those three features by tapping the buttons
labeled Exposure, Motion, and Ramping. The exposure bracketing, motion control, and ramping screens are
described later in this document.
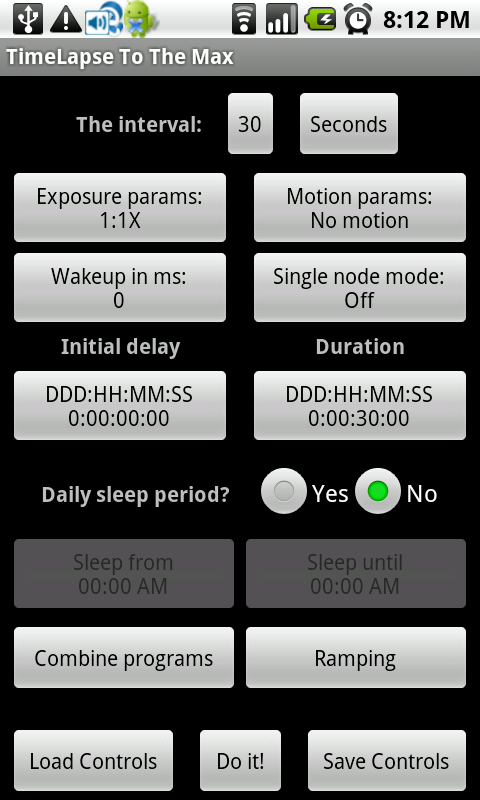
The interval
The interval defines how often the process of taking exposures and moving the camera should occur.
There are two buttons at the top of the screen for setting the interval. Units can be milliseconds (there are
1000 milliseconds in one second),
seconds, minutes, hours, or days.
Initial delay
It is sometimes desirable to send the time-lapse program to the remote machine prior to when you want
it to start taking photographs. Tap the Initial Delay button to set the initial delay in seconds,
minutes, hours or days.
Duration
Tap the Duration button to set total length of time to continue taking photographs. You can set the
duration in days, hours, minutes, and seconds. The duration period starts after the initial delay.
Wake-up pulse
Modern cameras have the ability to enter a sleep mode, in which they use very little power.
For long duration
time-lapses, it is advantageous to allow the camera to enter sleep mode and wake it up when it is time to
take another photograph. Cameras that have a sleep
mode can typically be wakened by half-pressing the shutter release button. TL-Plus provides this capability.
When you tap the Wake-up
button, a pop-up appears asking you to enter the duration of a pulse to send to the camera on
the "half-press " line.
The duration is in milliseconds. You might need to experiment
with your camera to determine the time required to wake up the camera.
Sleep start and stop
One popular use of time-lapse photography
is to create a movie showing the construction of a building. This typically takes months to
complete. Up until now, no intervalometer
had the ability to start and stop at a specified time every day. The result was that someone either
had to manually start and stop the process every day or they had to laboriously delete irrelevant images
before making the movie. TL-Plus solves this problem by allowing you to set a period every day during
which no photographs are taken. This is called the sleep period. To activate sleep mode, tap Yes for
Daily sleep period, then set the times of day for the start and end of the sleep period. Note that
the time of day is based on the time in your phone at the moment you send the program to the remote
machine and the initial delay feature is inactivated when using the sleep function.
Single node
A node is the process that happens every interval, including any motion or multiple
exposures for bracketing purposes. In some situations you might not want to take a series of
photographs but do want to take a single photograph or bracketed set of photographs using the
current settings.
You can accomplish this by tapping the Single Node button. This will not only take a photograph
or bracketed
set of photographs, but it will also pan and/or tilt after taking the photograph(s) if you have
specified any motion parameters. This is a convenient way to take a single HDR set, for example.
Loading and Saving sets of time-lapse parameters
TL-Plus gives you the ability to save all the settings on the Time-lapse screen to be re-loaded the
next time you want to repeat the same process or to be combined with other sequences.
When you tap the Save button, TL-Plus prompts you for
a name to give to the saved settings. When you want to re-load the settings, tap Load and select
the named control set of your choice. TL-Plus always reloads the most recent control set when you start
it, even if you never explicitly saved them.
Do it!
Tapping the Do it! button has two effects.
- Sends the generated program to the device attached to your camera.
In order to send the program to a device such as AutoMate, you must first make a Bluetooth connection with that
device. Connecting via Bluetooh is discussed in a later section.
- Prepares an
email containing the parameters of the time-lapse
The email also includes the GPS coordinates the last time you got a fix and a
link to Google Maps with those coordinates. The To: field contains the address that you set up
through a menu option. All fields in the email can be edited, including the message content.
You can also choose to discard the message.
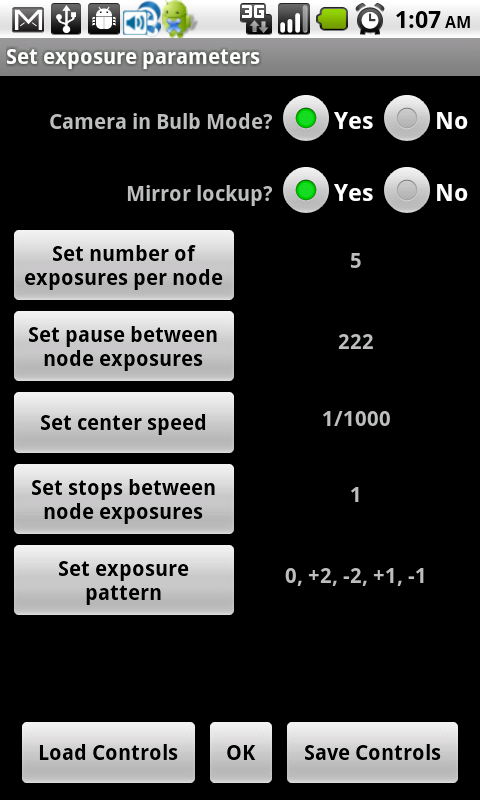
The Exposure Parameters screen
When you tap the Exposures button on the main screen, the Exposures screen appears. This is where
you define the exposure parameters for every node of the time-lapse series.
Bracketing exposures
As you probably know, when you set your camera's exposure setting to Bulb, the exposure begins within a few
milliseconds of pressing the shutter release and continues until you release it. TL-Plus can take
advantage of that mode of operation to precisely control the exposure. This is especially
valuable for very long exposures or for taking a set of bracketed exposures with more flexibility
than the camera permits using its automated bracketing feature.
CAUTION: With TL-Plus, you can specify very, very long exposures, even hours long.
However, you must use caution when making very long exposures on a digital camera because the sensor
can be destroyed if it is exposed for too long. You should consult your manual or contact the
camera manufacturer to find the maximum time for your camera.
There are two ways to take a set of bracketed exposures with TL-Plus:
- Using Bulb mode and letting TL-Plus compute the exposure times
- Using your camera's automatic bracketing feature
Using Bulb mode to bracket exposures
To use Bulb mode to bracket exposures you need to make several settings:
- Set the shutter lag for your camera
- Set Bulb mode to Yes
- Set the center speed for the set of bracketed exposures.
- Set the desired number of exposures per node
The choices are 1, 3, 5, 7, and 9.
If you choose 1, no bracketing will occur and the irrelevant controls will be disabled.
For all other choices, one exposure will be made at the center speed and an equal number
above and below that speed.
- Set the number of stops between exposures
A stop is a measure of exposure. Each change of one stop represents a two-times change in
the amount of light exposing the sensor. In TL-Plus, you can set the number of stops between
exposures to 0, 1/3, 1/2, 1, 1-1/2, or 2. If you choose 0 stops, all the exposures are made at
the center speed.
- Pick the exposure pattern
There are several exposure patterns that
you can choose from. They are mostly a matter of personal preference. The pattern displayed
in the list of choices shows a series of integers with plus and minus signs preceding them.
These integers indicate not stops, but the multiplier of the stop value you chose in step 4.
For example, if you chose 1/3 stops between exposures and 5 exposures and a pattern of
-2, -1, 0, +1, +2, TL-Plus will take the five exposures in the following sequence: -2/3, -1/3, center
speed, +1/3, + 2/3.
- Set the time to pause between exposures
Set this value in milliseconds.
Of course you also need to put your camera in Bulb mode before running the program.
Using your camera's auto-bracketing feature
You can still bracket exposures when not using Bulb mode by setting your camera to automatic
exposure bracketing (AEB). If you make this camera setting, you must also set the number of
exposures in TL-Plus to correspond to the number of bracketed exposures.

To do exposure
bracketing this way, you must do the following three things:
- Set your camera to do automatic exposure bracketing.
- Set Bulb mode in TL-Plus to No
- Set the number of exposures in TL-Plus to the appropriate number for your camera's
auto-bracketing mode.
- Set the duration of the pulse used to trigger the shutter release.
This value is set in milliseconds. Usually a few hundred milliseconds is adequate to
fire the shutter.
Pause between node exposures
If you specify more than
one exposure per node, you also need to specify how long to pause between those exposures.
Set this value in milliseconds.
Mirror lock-up
Many SLR and DSLR cameras have a
mirror lock-up feature that causes the camera to move the mirror out of the way
before firing the shutter. This is useful in situations where the shutter speed is so
slow that the vibration from the mirror moving out of the way can result in "camera shake "
visible in the image. To use mirror lock-up you must explicitly set the mirror-lockup
option on your camera. When mirror lock-up is set, you must press the shutter release
twice for every exposure. Upon the first firing of the shutter, the camera moves the mirror.
Upon the second firing of the shutter, it takes the photograph. When mirror-lockup is set
in TL-Plus, two shutter release signals are created
for every exposure. To activate the mirror lock-up feature with TL-Plus, tap the
Mirror lock-up button and enter both the pulse time required to signal the camera to
lock up the mirror and the amount of time to wait before firing the shutter to take the
photograph. The mirror lock-up settings are displayed on the button with the pulse time
first and the settle time second. Both values are in units of milliseconds.
Loading and Saving sets of exposure parameters
TL-Plus gives you the ability to save all the settings in the Exposure Parameters screen to be
re-loaded whenever you want to use the same parameters. When you tap the Save button, TL-Plus
prompts you for a name by which the settings are saved and re-loaded. To re-load a named set of
controls, tap Load and select the named control set of your choice. TL-Plus automatically reloads
the current set of parameters when you return to the Exposures screen even if you did
not save them in a named file.
Upon returning to the main screen from the Exposure params screen, the
Exposure params button shows a condensed recap of the exposure settings. For example,
if the center speed is 1/500 sec for 7 exposures, 1/3 stop apart, the info on the button
would be "1/500:7x(1/3) "
Motion parameters screen
On the main screen there is a button
you tap that causes the Motion parameters screen to appear, where you can define how the head moves
between each node.
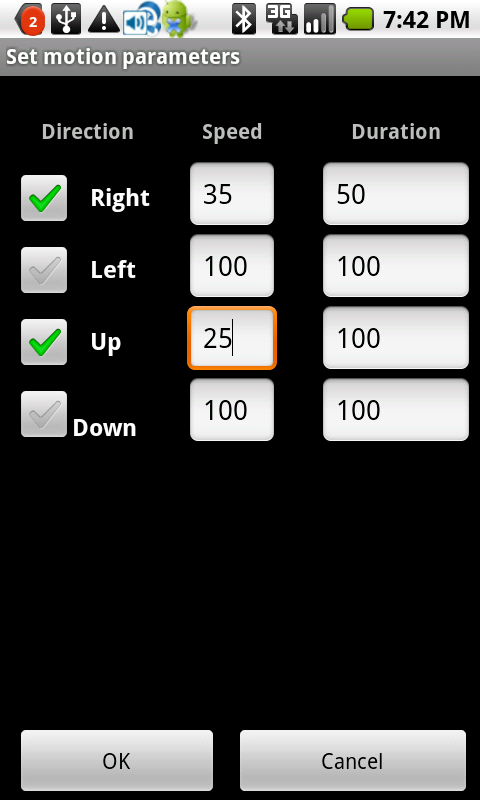
The motion parameters screen permits you to tell the pan-tilt head how far to move
for each node. You can specify moving Right, Left, Up, and Down. It is logically inconsistent
to select both Right and Left or Up and Down and you are prohibited from those combinations. But
you can specify moving both horizontally and vertically at the same time. For a given direction,
you must set two values. The first value corresponds to motor speed on the AutoMate robot and the
allowable values are 10-100 percent of full-speed. The second value corresponds to milliseconds
of motor on-time on the AutoMate robot. Programs that control other pan-tilt heads can use these
values to specify other values, such as fractional degrees of travel, for example.
Upon returning from the Motion parameters screen, the Motion button text contains the
current motion settings. The most recent motion parameters are restored the next time you return
to this screen.
Ramping
Ramping is the gradual increase or decrease of a parameter throughout
the time-lapse sequence. TL-Plus offers three kinds of ramping, exposure, intercval, and head motion.
You can specify ramping of all three types at once and have different parameters for each type.
And you can specify a different ramping curve for each one.
For example, you can increase the exposure over three stops using a linear ramp, while decreasing the interval
from 1 minute to 1 second using a different curve, and moving the head
both horizontally and vertically at different rates and with different ramp curves -- all in the same
timelapse sequence.!
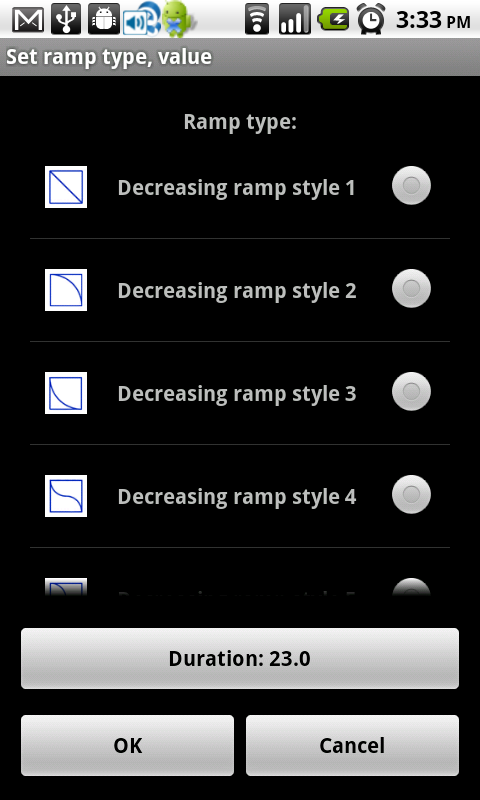
Tap Ramping to see the first screen for setting the ramping paramters.
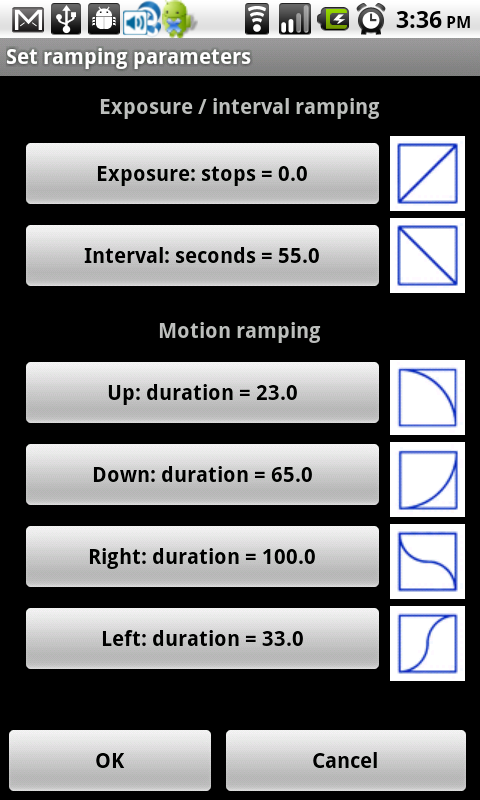
The small image to the right of each rampable parameter shows the curve of the ramp that is
currently selected
for that paramter.
There are 10 curves from which you can select, five decreasing and five increasing.
The text on the button indicates the total change in that parameter over the duration
of the entire sequence. If the value on the exposure or interval button is non-zero, ramping is selected for
that parameter. If it is zero, ramping is disabled. For motion ramping, the value must be non-zero and
the motion must be selected for that direction in the Motion screen. To change any of the values or the
ramp style, tap the button for the parameter you want to change. This causes the next screen to appear,
in which you choose the ramp style and the amount of ramping to occur.
Ramping parameer selection screen
Since it is possible to concatenate sequences, you can build a long sequence consisting of some with ramping
and some without, or one with one rate of change and another with different rates of change.
In every case, the initial value of the varying parameter is the value you specify on the
main screen. For example, if you specify an interval of 10 seconds on the main screen and an increasing
ramp value of
40 seconds, the initial interval will be 10 seconds and the final interval will be 50 seconds.
Exposure ramping
For
exposure ramping, if the initial exposure time is 1/100 seconds and you specify 1 stop of increasing change
during the period of the sequence, the final exposure time will be twice as long, or 1/50 second. If you
are shooting bracketed exposures, every exposure in the bracket is ramped.
Interval ramping
For interval ramping, the value you enter is the total change in the increment over the period
of the sequence. The value you enter must be a positive number regardless of whether the interval
is decreasing or increasing.
Motion ramping
For motion ramping, only the duration of the motor on time is ramped. In a later release,
it will be possible to ramp either/or duration and motor speed.
Ramp curves
The ramp style you choose determines whether the ramp is decreasing
or increasing. There are five decreasing ramps and five increasing. You can choose from the
following styles for both increasing and decreasing:
- Changing linearly
- Changing slowly during the first half and rapidly during the second half
- Changing rapidly during the first half and slowly during the second half
- Changing rapidly during the first quarter, slowly during the second and third quarter and rapidly during the last quarter
- Changing slowly during the first quarter, rapidly during the second and third quarter and slowly during the last quarter
Each ramping style is accompanied in the selection list by a graphic that describes the change curve.
Combining programs
In some cases it makes sense to create two or more
time-lapse programs with different sets of controls and then to combine them into one larger program.
An example might be a program that pans to the right and another program that pans to the left.
With TL-Plus, you can make a combination program that pans to the right for a certain number of
intervals, then reverses direction and pans left. You can even specify how many times to repeat
the process. When you tap the Combine Programs button a screen appears that allows you to
concatenate programs and to set up repetition loops.
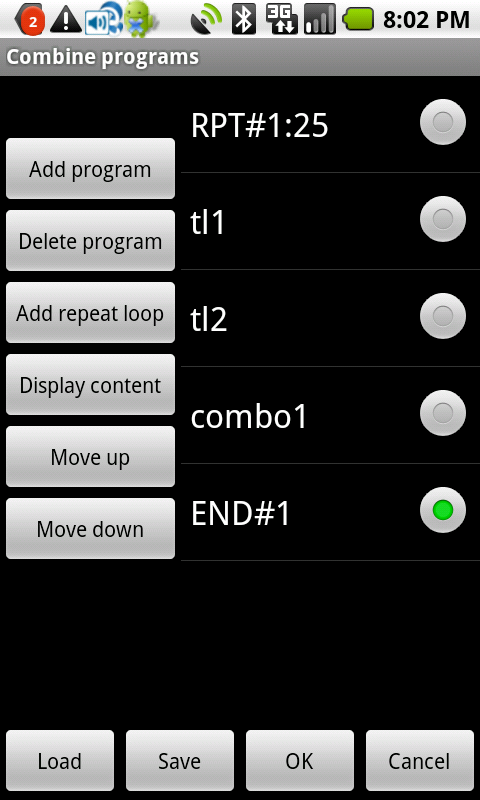
The following six buttons are for managing the list of programs:
- Add Program
Presents a list of all the saved programs from which to choose. The one you choose is
initially added to the bottom of the list on the right. You can add not
only named time lapse programs, but also named combinations that you previously saved. The
named combinations appear in the selection list with asterisks at the ends of their names.
- Delete Program
Deletes the currently selected item from the list. There is always one item that is the current
item, as indicated by the illuminated radio button next to it. If the current item is the beginning
or end of a repeat loop, both the beginning and end statements are deleted.
- Add Repeat Loop
Adds a repeat loop to the list. A repeat loop includes the
count of times to repeat and a matching end statement. The repeat function provides a way for
a set of programs to be executed repeatedly for a specified number of times. All the items between
the start and end of a repeat loop are executed in sequence from top to bottom over and over as many
times as the specified repetition count. You can nest up to five repeat loops. The start of a
loop appears in the list with the name RPT#, followed by number of the loop, followed by the
count of times to repeat. In the screen above, there is one repeat loop, named RPT#1:5, which
stands for repeat loop number 1, which will repeat 5 times. An END#1 statement appears at the
end of the list of programs, indicating the end point of loop number 1.
- Display Content
Displays the parameters of the currently selected program. This is a convenience to remind
you of the parameters for the program. You can only see the content of a time-lapse program,
not another named combination program.
- Move up
Moves the currently
selected item up in the list. You can use this for programs and Repeat start and end items.
End-repeat items cannot be moved above the corresponding Start-repeat item.
- Move down
Moves the currently selected item down in the list. You can
use this for programs and Repeat start and end items. Start-repeat items cannot be moved below
the corresponding End-repeat item.
There are also four buttons across the bottom of the screen:
- Load
Presents a list of previously saved combinations that you can restore.
- Save
Saves this combination with the name you assign.
- OK
Sends this combined program to the external machine for execution.
- Cancel
Cancels this operation and returns to the main screen.
The Roll Your Own (RYO) screen
The RYO screen is presented by selecting the Roll Your Own menu option. RYO offers the ability to
create any kind of program you want. There are six buttons on the left side of the screen that give you
the controls you need to build and modify a custom program.
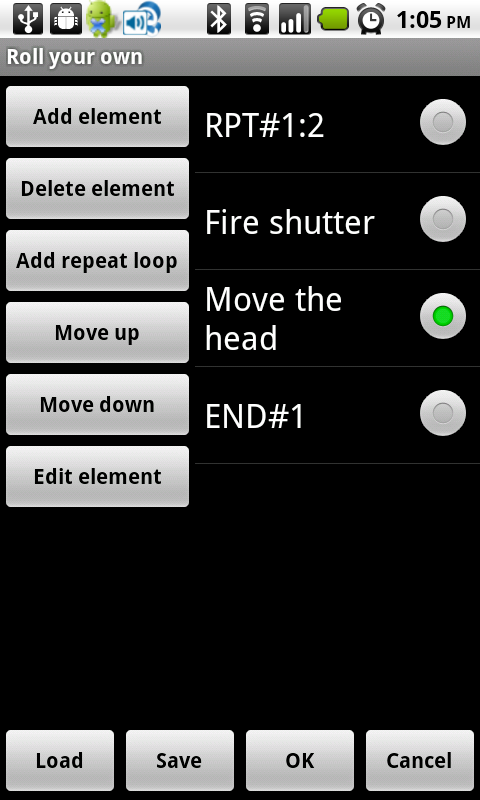
- Add element
By tapping the Add element button you are offered a list of
elements you can add to your program, including:
- Fire shutter
You are prompted to enter the time of the fire shutter pulse in milliseconds.
- Half press
You are prompted to enter the time of the half-press pulse in milliseconds.
- Move the head
You are prompted to enter the direction or directions of motion as well as the speed and duration.
- Time delay
You are prompted to enter the amount of time to pause in milliseconds
- Flash LED
You are prompted for the on-time, off-time and number of flashes.
- Delete element button
Tapping the Delete element button deletes the selected element from your program.
- Add repeat loop
The Add repeat loop button prompts you for the number of repititions in the loop. The syntax and operation
of this command is identical to the equivalent command in the Combine Progroams screen.
- Move up
Tapping the Move up button moves the selected program element up in the list of elements
- Move down
Tapping the Move down button moves the selected program element down in the list of elements
- Edit element
Tapping the Edit element button allows you to modify the parameters of the selected element.
There are also four buttons across the bottom of the screen:
- Load
Presents a list of previously saved combinations that you can restore.
- Save
Saves this combination with the name you assign.
- OK
Sends this combined program to the external machine for execution.
- Cancel
Cancels this operation and returns to the main screen.
The Experiment Screen
The purpose of this feature is provide a way to discover some information about how
your camera works
when operating in Bulb mode.
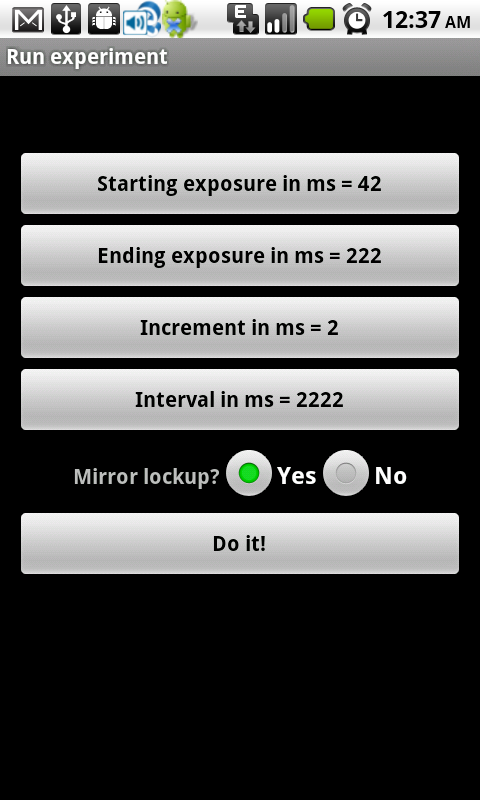
In particular, you need to find the shutter lag time and minimum
usable shutter time.
To find these timess, you need to perform
some experiments in which you take a sequence of incrementally increasing exposures in Bulb mode. You
might want to run these experiments both with and without setting mirror lockup. In our experience,
using mirror lockup produces much more reliable and repeatable results. But this
is something that you can determine for yourself. There is a mirror lockup option you can
select on the Experiment screen.
A good first experiment is to determine the minimum shutter activation time. Cameras are
not typically designed for Bulb mode activation in the millisecond range but many do in fact
respond to very fast shutter times. Every camera requires the shutter release to be activated for some
minimum lenght of time before it will fire the shutter. This value varies greatly from camera model
to camera model and it is important for you do determine what that value is for your camera.
To do this, for the first pass, set the Starting time to 1 ms,
the ending
time to 5 ms, abd the increment to 1 ms. The interval can be any value large enough to permit
writing the image to th memory card. When you tap "Do it!" the program is sent to the AutoMate
(providing you remembered to connect).
If, when you run this experiment,
your camera does not fire at all, it may
be that it requires more than 5 milliseconds to activate the shutter. Or if it only takes two exposures instead of
the expected fice,
the chances are that your camera requires 4 milliseconds to activate the shutter. Continue
increasing the starting and ending values until you find the minimum amount of time it takes to activate
the shutter.
A good second experiment is to find the shutter speed at which changes in shutter speed result in
changes in the image exposure. In this experiment, set the starting time to the activation time you found from
your first experiment and the ending time to, say, 20 ms greater, again incrementing by 1 ms.
View the result of shooting this sequence on your computer and look for the point at which
increases in exposure time results in a significant change in the image exposure. You may need to
increase the ending speed if you do not see a significant change from exposure to exposure.
Once you determine at which point this happens, you need to save that
value as the minimum Bulb-mode exposure time, which you can do by choosing the Set Defaults menou
option.
The next good experiment to try is to determine the shutter lag time. the
To do this, take a bulb mode sequence, starting at the minimum exposure
time you discovered in the precious experiment and increment the exposure
by one millisecond up to
perhaps 150 milliseconds. Then take a set of manual exposures at every shutter time between 1/1000 (one ms) and 1/10
(100 ms). The manual mode photographs should be taken of the same
scene as the Bulb mode sequence and should use the same lighting and aperture and ISO setting.
Once you have taken both sets of images, transfer them to your computer and find the
Bulb mode exposures that most closely match each of the
manual mode exposures. In our experience, the best way to compare the exposures is to use
a program like Breeze Browser Pro, which permits you to have two instances open at the same time and also allows
you to rapidly cycle through a set of images, displaying a histogram of each images. Comparing the
histograms is a much more accurate way of finding matching exposures than by visually comparing
them.
When you find the Bulb mode image that most closely matches a manual mode image, compute
the difference between the number of milliseconds for the manual-mode image and the Bulb-mode
image. (To compute the
number of milliseconds for a manual mode exposures, do
the division and then multiply by 1000. For example, 1/8 second exposure = .125 times 1000, or 125
milliseconds. If you already knew this please do not be offended, but there are people
who have no idea what a millisecond is or how to convert between common shutter times and
milliseconds.) The exposure time for the Bulb-mode image will be greater than the matching
manual mode exposure. The difference between the two is the shutter lag time. In our
experiments, the shutter lag times did not vary by more than a millisecond or two
from one exposure time to the next throughout the 1/1000 to 1/100 range.
Oncce you determine the shutter lag time for your camera, you need to save that
value as the default value, ujsing the Set Defaults menu
option.
The Remote Control screen
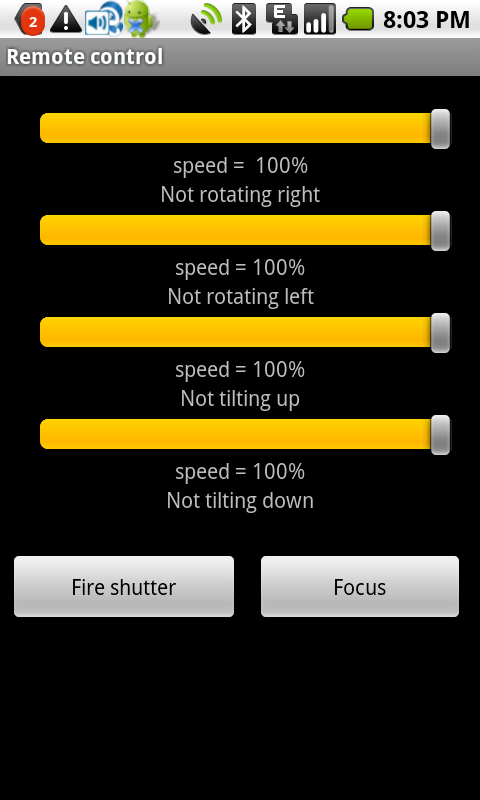
You can use the TL-Plus program to remotely control the AutoMate
robot, causing it to pan and tilt in real time and to fire the shutter and focus the lens.
There are six controls on the remote control screen, four sliders for setting the
speed in the Right, Left, Up, and Down directions, and two buttons for Focus and Firing the
shutter. The sliders not only set the speed of motion but tapping and holding a slider causes
the head to pan or tilt in real time.
Menu choices The menu button brings up a set of
options that include the following:
- Connect
Use this menu choice to search for and connect to the external device via Bluetooth.
A list appears of all the Bluetooth devices that are detected by the phone. Tap the name
of the external device that is connected to your camera, AutoMate if the device is AutoMate.
- Documentation
Displays this document.
- Fire shutter
Choosing this option sends a command to the external device to fire the shutter. You can use
this as a simple remote shutter release. This is also useful for cancelling a running program.
If you sent a program to the AutoMate device and it is in progress, this will stop the program
but not fire the shutter until you send another Fire shutter command.
- Experiment
This option initiates the Experiment feature. The purpose of this feature is give you a way
to find the
correct shutter lag time and the minimum shutter time for Bulb mode operation, as described in the
Experiment screen.
- Remote control
The remote control feature allows you to remotely control the AutoMate
robot, allowing you to pan and tilt in real time and to fire the shutter and focus the lens.
Tapping the Remote Control button displays the Remote Control screen.
- Set defaults
There are five defaults that you can set:
- Mirror lockup pulse
This value controls how many milliseconds the mirror lockup pulse should last. This varies from
camera to camera but a value of 500 is usually a good choice.
- Mirror lockup settle time
This value controls how long to wait after sending the mirror lockup pulse before activating the shutter.
Choosing this option opens the Remote Control screen.
- Shutter lag time
This value is only used in connection with Bulb mode exposures. When you specify an exposure time in
Bulb mode, the camera takes a certain amount of time to prepare the shutter before starting the exposure.
This is known as the shutter lag time. Every camera has a different characteristic shutter lag time.
TL-Plus needs to know what that time is and to add it to the exposure time to get an accurate exposure.
For example, if the shutter lag time for your camera is 42 milliseconds, and you want to take an
exposure at 1/10 second, then the shutter must be held open for 142 milliseconds instead of 100 milliseconds,
as you might think. To determine the shutter lag time for your camera, use the
Experiment feature of TL-Plus. You are prohibited from selectin Bulb mode Yes
on the Exposure screen until you havce entered a default shutter lag value.
- Minimum shutter time
Cameras are not, as a rule, designed to handle very short Bulb mode exposure times. As a result,
some cameras do not support very short exposures when in Bulb mode. TL-Plus uses this value to warn you
if an exposure within a sequence is shorter than the minimum. To determine the minimum
Bulb mode exposure time for your camera, use the
Experiment feature of TL-Plus.
- Email address
Sets the default email address for sending generated emails. You can enter multiple addresses,
separated by whatever separator your email program requires. You can also override this choice
when an email is generated.
- Get location
Gets the GPS coordinates, which will be included in the email generated when you create
a time-lapse program. If GPS is turned off when you choose this option, it will first display
a screen asking you to turn GPS on. It sometimes takes up to several minutes to get a fix on
your location. When your location is found, TL-Plus pops up a message saying that it got a fix.
The most recent location found is saved and is the location that appears in all emails until you
get a new fix on your location. You can always check the most recent location that was found by
using the Get most recent location menu option.
- Roll your own
The Roll-your-own feature provides a powerful additional way to create your own programs. If
the other controls are not adequate to generate the program you need, you can use the Roll-Your-Own
feature to command the AutoMate robot to do virtually anything in its power.
- Get orientation
Gets the orientation of the phone. Before choosing this option, hold the phone horizontal
to the ground and pointed in the direction that you want to save. The internal compass of the
phone reads the orientation of the phone in degrees from North and displays this in generated emails.
- Turn off GPS
Use this when you no longer need GPS. This helps to save your
batteries.
- Get version
Displays the version of the
TL-Plus program.
- Most recent location
Displays the latitude and longitude and time of acquisition of the last location fix.
- Manage files
Displays a screen that permits you to delete saved files and control sets, including time-lapses, exposures,
combinations, and Roll-Your-Own programs.
|
